
I’m constantly buying old molding planes at local auctions. I can usually pick them up for a song since they really don’t attract much interest from tool collectors. They come in various forms and sizes but the most common in the marketplace are hollows & rounds and beading planes. This plane is a cove and bead. A sweet little plane that is useful for adding little detail moldings on cabinets.

This plane is overall in good shape, just a little dirty and neglected. But a little elbow grease and a citric acid bath, it will tune up in no time.

The blade has some surface rust but no serious pitting. I dipped it in a citric acid solution which contained a tablespoon of citric acid with five cups of warm water. My trough is nothing more than a scrap piece of plastic gutter with an end cap glued to each end. It works well and hasn’t leaked in the past three years.

After the blade sat in the solution for a few hours, I scrubbed it clean with a piece of steel wool and washed it off in the sink. I then sharpened the back by lapping it on some water stones.

As far as the body, I didn’t do too much. I simply wiped it with 00 and 000 steel wool then applied a couple of coats of mineral-oil/orange-oil/beeswax solution to the body and wedge. I didn’t rub steel wool on it too much as I didn’t want the plane to look new. Since it’s over a hundred years old, it should look like it’s that old but in working order.

The biggest obstacle that you’ll face tuning up a molding plane is matching the blade to the soul’s profile. After decades of the wood expanding and contracting, losing moisture and drying up, it’s not unusual for the soul to change. This plane’s blade doesn’t match up perfectly to the soul. ideally the blade should protrude equally along the soul. Since it doesn’t I have two options. One is to reshape the blade to match the plane’s soul. Or two, reshape the soul a little bit to match the blade. The first option is the best since you don’t want to weaken the soul by removing wood away but in this case, so little wood needs to be removed, that option two would be much quicker.

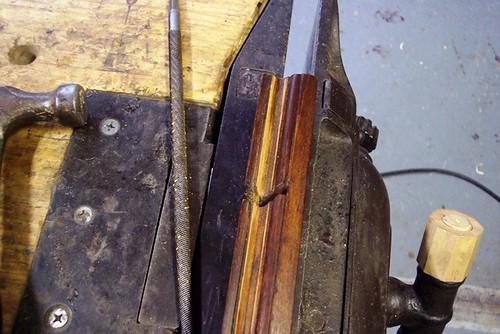
I needed to remove a little bit of wood by the end of the bead so I took a bastard file and shaved it down. I periodically checked the blade in the plane to make sure I had a constant protrusion along the soul. Once it did, I was done.
Next I needed to see how the plane performed. I grabbed a piece of straight grain poplar and started planing. The plane shaved off perfect shavings with no clogs.

This is how the molding would look when installed. You can see how the shadows bring out the curves of the molding. A nice little detail that adds a touch of class to cabinetry.

The plane looks nice too. It still has a nice warm dark color and plenty of patina to show off its age. I could have bought a router bit to do the same thing, but where’s the fun in that?

